Downloading the MegaDetector Image Recognition System
As mention on the Image recognition page, Timelapse does not do image recognition by itself. Rather, it relies on a recognition file generated by a third party. Most Timelapse users use the MegaDetector image recognizer. To get MegaDetector to produce a recognition file for your images, you need to either
- submit your images to Dan Morris see here who will do it for you, or
- download the necessary MegaDetector software and run it yourself.
Downloading and running MegaDetector
Should I download Megadetector myself?
There are several reasons why this is worth it.
- you have full control of when to run the recognizer
- you may have restrictions on giving your images to someone else to process
- you can run a bunch of tests on small sets of your images before committing to processing all of them
- you can run it on whatever image set you want at your leisure
- you don't have to go through Dan everytime
- the optional EcoAssist graphical user interface makes it much easier to download and install and run MegaDetector (see below)
But there are also reasons why you may not want to download it.
- you have no technical know-how (although not that much is required) or time
- you have a really slow computer or a very poor graphics card (which affects how fast image recognition takes)
- you really just want someone else to do it, especially if you only expecct to send images infrequently
- you can't afford to have your computer churning through a million images, as you use your computer heavily for other things (although you can run it on evenings or weekends for those really big image sets).
- Aside: How many images can I process per day?. A computer with an NVidia graphics card (even a cheaper one) will likely handle ~400K image recognitions / day. If your computer has a different video card, it should still be able to handle about 40K image recognitions / day.
The good news is that my own attempts to download and run MegaDetector went very smoothly on a Windows computer. It will likely take about 15 minutes (or less) from starting the download process to the point where you can are run it on your own images.
Download MegaDetector
Two methods are available. The simpler method is to do Method 1: EcoAssist. To explain, Peter van Lunteren created a wrapper around the MegaDetector installation process that should let you install all the required Megadetector software with a single click. However, if that doesn't work, try Method 2.
Method 1. EcoAssist: The single click approach, including a graphical user interface.
- Go to the Windows installation section of the EcoAssist Install for Windows page for full instructions (but see the EcoAssist home page for a general idea of what EcoAssist offers). Essentially, all you have to do is download and execute several installation files. This installs quite a bit of stuff (e.g., the Python programming system, Megadetector, etc). Don't panic if it takes 10 minutes or so and generates lots of textual feedback as it is installing. . If intested in details, see journal paper.
- A shortcut to the executable EcoAssist file will be created in your Downloads folder. Move it to a more convenient place (e.g., your desktop)
- If your machine is locked down, there are also instructions that page on how to manually download the various bits, although that is more work.
- Unlike method 2, this install includes the EcoAssist graphical user interface, which simplifies running MegaDetector.
Method 2. Downloading MegaDetector yourself.
The MegaDetector page contains full instructions, with version specific information available MegaDetector Version 5 Release Notes. There's lots of information on these pages, and you may want to scan some of it.
Downloading MegaDetector will give you more control in how image recognition is done and the files it creates. However, that does require you to read and understand the MegaDetector details. Most people will not need that level of control, which is why we recommend EcoAssist as an easier to use front end to MegaDetector.
To begin downloading, the Using the model instructions on the MegaDetector page details the Windows download instructions. While it seems complicated, you can just blindly follow the instructions without really knowing what they are doing. In particular, these are the sections of importance for downloading Megadetector
- Install prerequisites: Anaconda, Git, and NVIDIA stuff
- explains how to install the software that MegaDetector relies on. More straightforward than it looks!
- Download the MegaDetector model(s)
- Step by step instructions on how to download the MegaDetector models. This really just involves opening an Anaconda window (explained in the instructions), and copying / pasting text into that window. While there are explanations about different MegaDetector versions (md4 vs md5), just use the recommended defaults.
Running MegaDetector
Method 1. Using the EcoAssist graphical user interface.
If you downloaded EcoAssist, you should now have a shortcut in the Windows Download folder. For convenience, move to your desktop.
Double click it. A window like this will appear. Then follow the instructions below.
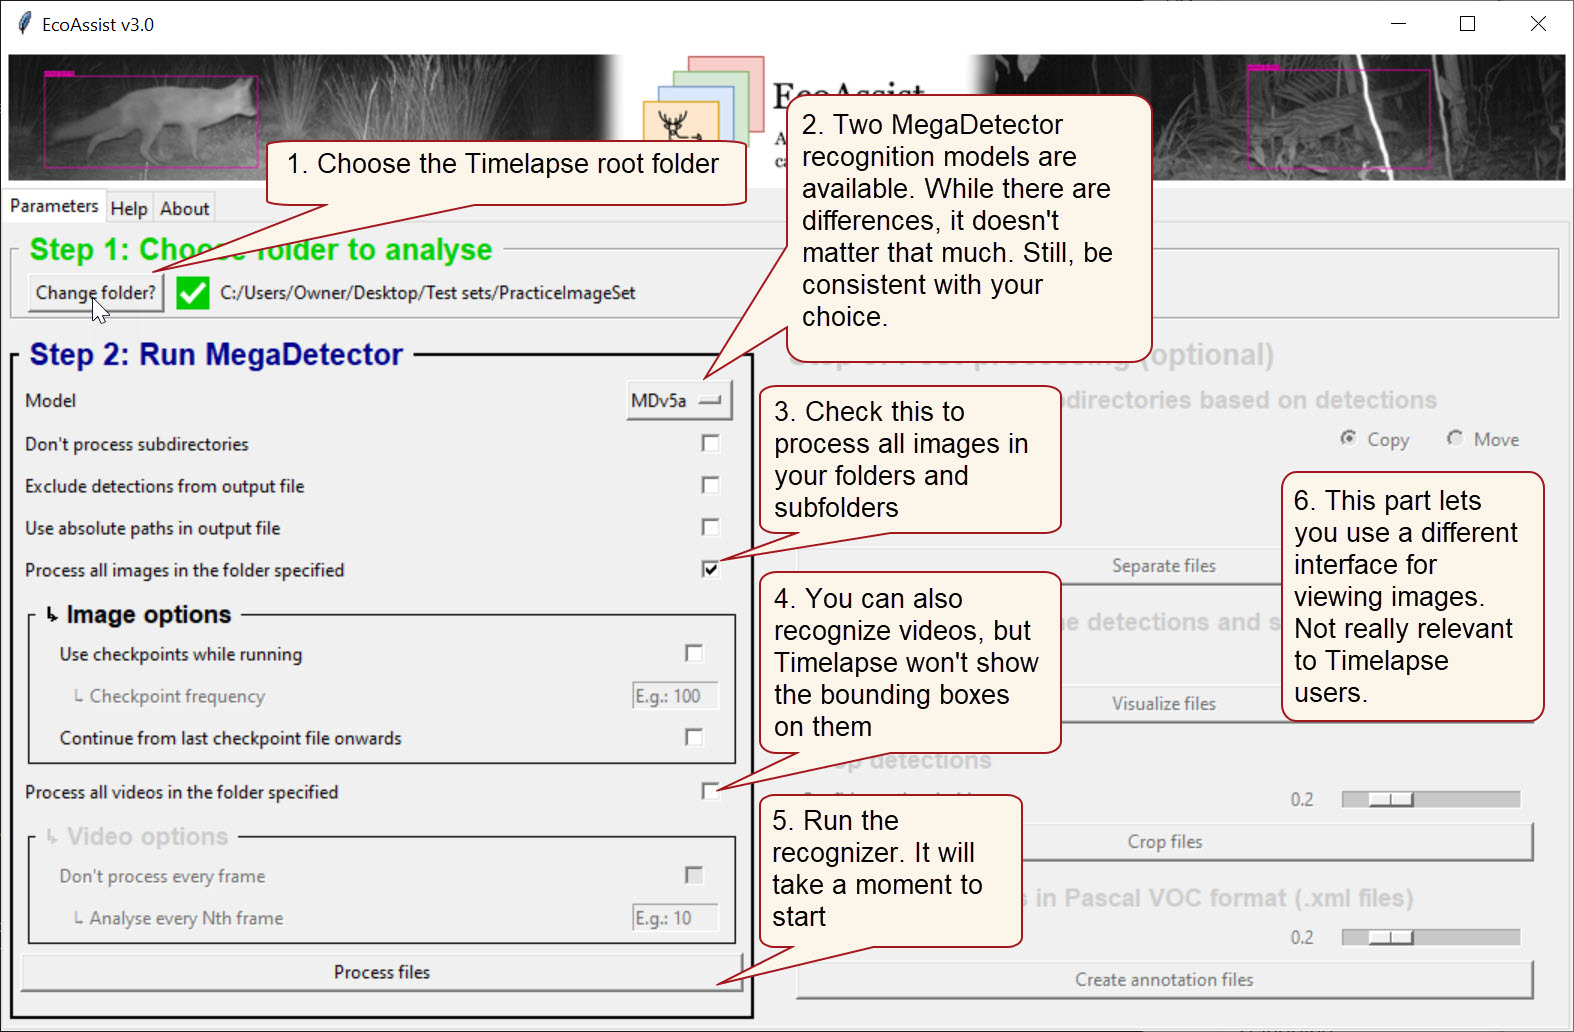
- Fill out the various fields as shown in this image.
- Folder containing camera trap data. If the folder is:
- the root folder (the folder containing your .tdb template file), the path names to your images will be identical to what Timelapse expects. Timelapse will be able to locate your files with no extra work.
- a sub-folder somewhere within the root folder, the path names to your images will be incomplete relative to your root folder. However, if you place the resulting json file in that sub-folder, Timelapse can recognize and complete those paths. This method lets you incrementally add sub-folders and image recognitions to your image set over time, i.e., as camera cards are retrieved from the field.
- The Model settings can use the value illustrated in the image. There are two MegaDetector models currently available: MDv5a and MDv5b/ While both produce somewhat different recognition results, there is no good reason to favor one over another (although you can test them with your images).
- If you have a ton of images, you may want to check Use checkpoints while running and enter a Checkpoint frequency (e.g., 500). This will save the recognition file after every 500 images. If for some reason your machine shuts down, you can run EcoAssist again, where it can then pick up where it left off.
- Folder containing camera trap data. If the folder is:
- Click Process files. You will get a small window describing its progress.
- When it is done, you will see a new json_file folder containing the output .json file. We recommend that you move that to its parent folder.
- You can now import that file using Timelapse's Recognition | Import image recognition data for this image set... menu item.
Method 2. From the command prompt.
On the MegaDetector page, scroll to the text beginning with 4. Hooray, we finally get to run MegaDetector! Follow those instructions. It is pretty easy:
- Start the Anaconda command prompt.
- Copy/paste the text specified in the instructions into the prompt window
- When it is done, you may want to move the recognition file to the root folder for your image set. You can then import that file using Timelapse's File| Import image recognition data for this image set... menu item.
Important Side note about the recognition file. Timelapse uses the relative paths in the image recognition file to locate your images. Thus it is important that your sub-folder structure is the same as what you will be using within Timelapse. See the Timelapse Image Recognition Guide for details.